Programming guide
Getting started
Installation
- The following components are required to build the Serial to Ethernet application:
- sw_serial_to_ethernet: git://github.com/xcore/sw_serial_to_ethernet
- sc_multi_uart: git://github.com/xcore/sc_multi_uart.git
- sc_xtcp: git://github.com/xcore/sc_xtcp.git
- sc_ethernet: git://github.com/xcore/sc_ethernet.git
- sc_util: git://github.com/xcore/sc_util.git
- sc_website: git://github.com/xcore/sc_website.git
- sc_slicekit_support: git://github.com/xcore/sc_slicekit_support
- sc_otp: git://github.com/xcore/sc_otp
All these components are packaged in the software distribution package (XM-004695-SM serial_to_ethernet_2.0.0). Once this zip file is selected, you can follow the below instructions to build and use the software.
Import and build procedure using xTIMEcomposer studio
To install the software, open the xTIMEcomposer (v13.0.0 or later) and follow these steps:
- Open the xTIMEcomposer studio.
- Open the Edit perspective (Window -> Open Perspective -> XMOS Edit).
- Click Import option in the Project Explorer window (Import -> General -> Existing Projects into Workspace and click Next).
- Choose Select archive file option and click Browse button.
- Select s2e release zip file and click Finish button
- The application is called as app_serial_to_ethernet in the Project Explorer window.
Build the serial to ethernet application:
- Click on the app_serial_to_ethernet item in the Project Explorer window.
- Click on the Build (indicated by a ‘Hammer’ picture) icon.
- Check the Console window to verify that the application has built successfully.
Flash the web pages and device configuration
To flash the web pages and device configuration using xTIMEcomposer studio:
- In the Project Explorer window, locate the app_serial_to_ethernet.xe and web_data.bin in the (app_serial_to_ethernet -> bin).
- Right click on app_serial_to_ethernet.xe and click on (Flash As -> Flash Configurations...).
- In the Flash Configurations window, double click the xCORE Application to create a new flash configuration.
- Navigate to XFlash Options tab and apply the following settings:
- Check Boot partition size (bytes): and its value as 0x10000
- Other XFlash Options: as –data bin/web_data.bin
- Click on Apply and then Flash to the XMOS device.
- Check the Console window to verify flashing progress.
Building from command line tool
To build from the command line, navigate to app_serial_to_ethernet directory and execute the command:
xmake all
Inorder to build the firmware with a static IP (say 169.254.196.178), execute the following command:
xmake all STATIC_IP=169.254.196.178
To flash the application, configration and web pages, execute the command:
xmake flash
Source code structure
Directory structure
The source code is split into application source code and web pages. The application builds into a single executable using the source code from the modules. The modules used by an application are specified using the USED_MODULES variable in the application Makefile.
The source package contains:
| Directory | Description |
|---|---|
| src | Source files that implement application functionality |
| web | Web (html) pages used by the web server module |
| images | Images that are displayed on the web (html) pages |
Supported modules originate from other repositories:
| Directory | Description | Repository |
|---|---|---|
| module_mii_singlethread | Lite version of low level ethernet interface over MII | sc_ethernet |
| module_ethernet_smi | A library code to communicate with ethernet phy using the SMI protocol | sc_ethernet |
| module_xtcp | XTCP TCP/IP stack | sc_xtcp |
| module_multi_uart | Multiple UART TX server and RX server | sc_multi_uart |
| module_xc_ptr | A library to allow XC code to access pointers via inline assembly calls. | sc_util |
| module_website | Embedded website component | sc_website |
| module_mutual_thread_comm | A protocol that allows two cores to communicate | sc_util |
Key files
| File | Description |
|---|---|
| xtcp_client_conf.h | Header file for clients of the TCP/IP stack. |
| udp_discovery.h | Header file for declaring UDP port, firmware version and function declarations required for s2e device discovery |
| uart_config.h | Header file containing delclarations for UART data strcutures and interfacing with multi-uart server component |
| web_server_conf.h | Header file declaring all the functions called from the web pages |
| telnet_config.h | Header file for configuring UARTs via telnet socket |
| multi_uart_rx_conf.h | Header file for multiUART RX server configuration |
| multi_uart_tx_conf.h | Header file for multiUART TX server configuration |
| s2e_conf.h | Header file to enable debug options for s2e application |
Notes on application interfaces
This section provides a brief description on main application interfaces.
UART configuration
The initialisation and configuration process for both the RX and TX operations is the same. The files multi_uart_tx_conf.h and multi_uart_rx_conf.h are used to configure multiUART TX and RX servers for the default values. For application configuration, the function uart_config_init() is used to apply configuration stored from flash or to use default application defined static configuration. The function uart_set_config() is utilised whenever there is a dynamic configuration change request (ie., a particular UART reconfiguration request). The flow is visualised in UART configuration flow.
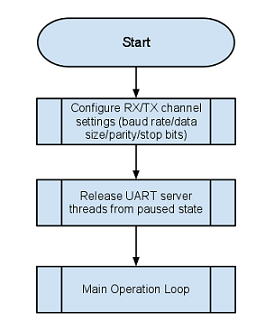
UART configuration flow
Webserver
The webserver handles all HTTP requests from the web clients. A web client may request to change UART settings, save current settings, or apply the previously saved UART seetings etc. Webserver identifies these requests, validates them and services those requests. It calls appropriate UART handler api’s to retrieve and set channel settings. For example, for a ‘Set’ request from the web page, the webserver handler utilizes website component in order to parse the form data from web page, the required UART parameters are extracted and the UART_Handler’s uart_set_config api is called to set the new UART configuration.
The Webserver interface utilises sc_website component to implement web server functionality. Refer to the Programming Guide section within the SliceKit GPIO Example Applications documentation linked from the front page documentation of sw_gpio_examples repository (git://github.com/xcore/sw_gpio_examples.git). This documentation contains more information on how to utilize the Embedded Webserver Function Library component in customizing web server applications.
Flash interface
- The s2e_flash core handles data to/from flash fitted on board. The UART configuration web (html) pages, UART settings and IP configuration are typically stored into flash. Web pages are retrieved upon request from the client to the web server. UART settings can be ‘saved’ and ‘restored’ from flash. They are usually done via:
- Request from web page (HTTP request)
- From Telnet configuration server
- Upon startup (to restore restore last saved settings)
IP configuration is saved via UDP server request and is requested from flash upon start-up.